


From this tutorial, you’ll learn how to install WordPress theme on local server using WAMP software.
WAMP is a free software allowing you to run a local server on your computer for tuning up websites. If you don’t know where you can get it, please, feel free to visit WAMP official website and download its package from here.
Please, check the WAMP Web Development Environment Installation tutorial to learn more about installing WAMP on your computer.
In case, you want to use another web development environment, please, check the tutorials listed below.

When WAMP is installed, you can run it on your computer.
Preparing for WordPress Installation
The second step is to install WordPress. It requires some preparations, e.g., tuning up WAMP settings and creating the database, so we’ll need to do it before we proceed to installing WordPress engine.
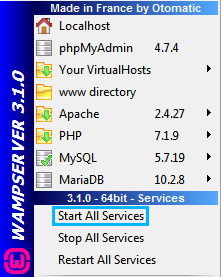
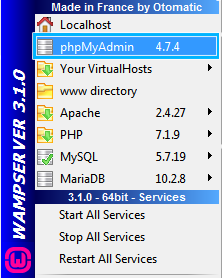
- Click WAMP icon in the bottom right corner of the taskbar.
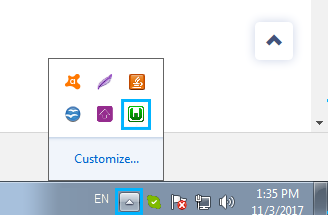
- Select Start All Services option. WAMP icon should become green. This means WAMP has started on your computer and everything works properly.
- Now let’s tune up its settings according to your needs. Check the needed WordPress engine requirements. Here they are:
- PHP version 7 or greater
- MySQL version 5.6 or greater
- HTTPS support
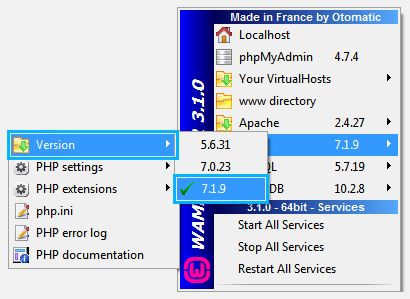
- Open WAMP menu and navigate to PHP > Version tab. Here select the version that is needed for WordPress to work properly.
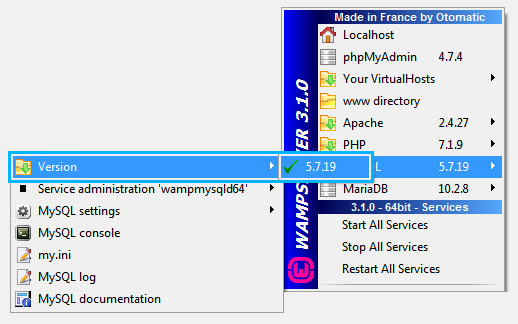
- Then go to MySQL > Version tab and select the needed version mentioned in the requirements.
- Now let’s open PhpMyAdmin tab.
- You’ll see the Welcome to phpMyAdmin screen. Here you can select the language that is more convenient for you.
- Type in your database username (in most cases it is root). If you use phpMyAdmin tool for the first time, it is most likely that there is no password.
So click on Go button leaving Password field empty.
- Now that you’ve accessed phpMyAdmin Home screen, you need to create a new database to use it for WordPress. To do it click New option in the left column.
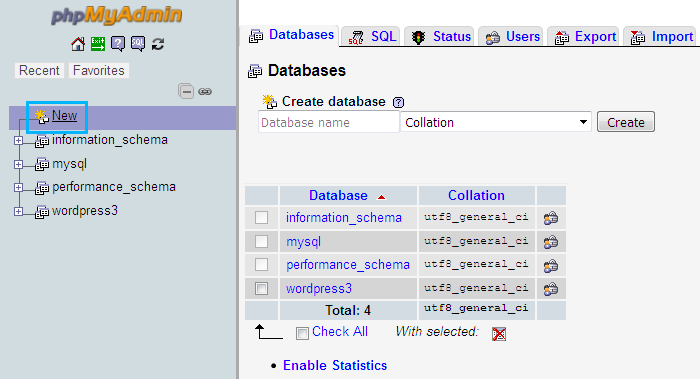
- In the Databases tab locate Create database block. Here you need to fill in the database name (e.g., new). After that click Create button.

Install WordPress
- Now we’re almost ready to install WordPress.To do it, please, download the latest WordPress version to your hard drive. Unpack the archive. After that you’ll have wordpress folder with all the necessary files in it. Copy this folder to the clipboard.
- Now locate WAMP folder. Here navigate to www folder in it. Here you need to paste wordpress directory you’ve previously copied.

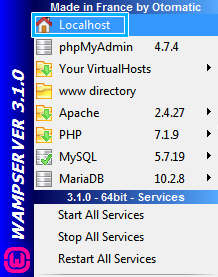
- After that, please, click WAMP icon in the bottom right corner. Here click Localhost and access your wordpress folder through your browser (e.g., http://localhost/wordpress/).
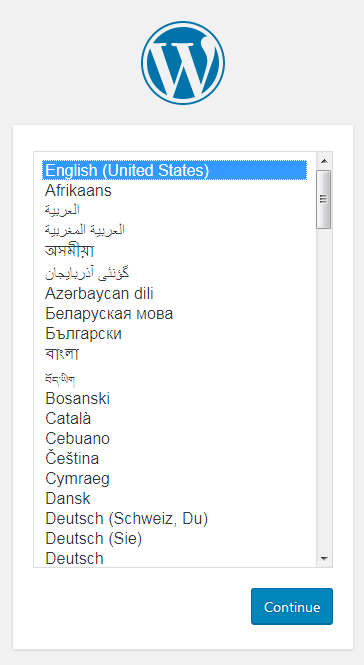
- If you’ve done everything correctly, you’ll see WordPress installation screen.
 To learn more about installing WordPress, please, read Installing WordPress tutorial.
 - Note, that in the Database field you should input the name of the database you’ve created in phpMyAdmin, and the database username should be root. If there was no password for the root user, then leave that field blank, as shown on the screen below.

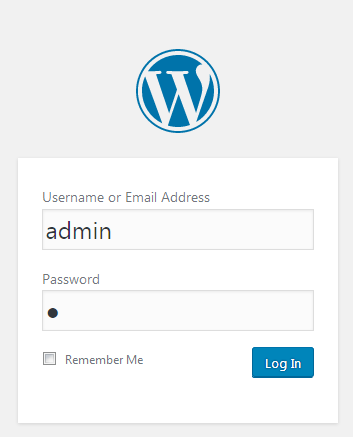
- When WordPress engine is installed, you’ll be able to access your website from your browser. Here type in the WordPress admin username and password you’ve set when installing WordPress.
Install WordPress Theme on Localhost Server
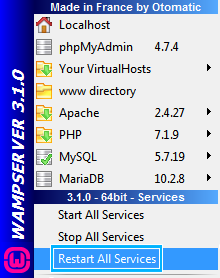
- Let’s install the theme to your new local website. To do it you should place the theme folder into wordpress/wp-content/themes directory.

- Then restart WAMP server and open Localhost to access your website.
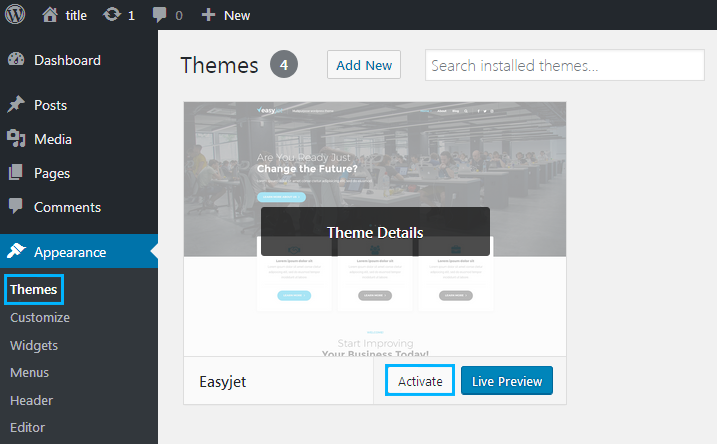
- Login to your website’s Dashboard using your username and password and navigate to Appearance > Themes tab in the left column.
- Now you can see the theme you’ve placed into wp-content/themes folder in the list of available themes. Click Activate button in order to activate it on your site.
- Please, feel free to read Template Installation with Cherry Theme Wizard tutorial in order to learn about plugins and demo content installation.
- You can also import your existing demo content using phpMyAdmin tool. To learn how to do it, please, read How to Change Database Prefixes and Import SQL file tutorial.
Now, you can enjoy the results. You’ve successfully installed WordPress theme on localhost server! In case you need to move your website from the local to live server, please, read How to Move Website From Localhost Server to Live Server tutorial.

