


Megamenu module extends standard Magento menu functionality and allows you to configure subcategories multi-column display, add static blocks and products to the dropdown menu.
Global configuration
In order to configure the module, open your Magento Admin Panel and navigate to Stores > Settings > Configuration section. There you need to choose the TEMPLATEMONSTER > Megamenu in the left-side menu to get to the module settings interface.

This module has 2 options:
- Enable/Disable — you can enable or disable the module if needed;
- Menu position — you can choose menu position here.
Menu position option can take the following values:
- Topnav — displays menu in site header;
- Sidebar — shows menu in sidebar.
[notice type=”warning”]Attention!!! If you’re going to display menu in sidebar, be sure to enable a layout with left or right column included. In case you have one-column layout active for pages and Menu position:Sidebar option is enabled, no menu will appear on the website.
Megetique theme:
If you’re going to display menu in sidebar, be sure to add class “in-sidebar” to “tm-megamenu” div.
Categories Configuration
Megamenu block display can be configured on the 1st level category configuration page, that can be found in the Megamenu tab, at Products > Categories section.
You will see the Turn on megamenu for this category option at the MegaMenu tab. This option enables Megamenu block display for the selected category. After enabling this option you will see the two fields and a widget with menu content settings.

You can set a label for your category to inform all the customers if category includes some new, sale, products etc.
The Label option allows you to display the label (new, sale) for the top level categories. This label has default styling, but its appearance can be changed by using Css class option. This option sets the class for current menu item’s <li> and <a> tags, so you can easily create custom styling for your label by using the class.
Set the number of rows and columns
Megamenu block content settings allow you to define the number of rows and columns, specify their width and lot of other settings.
In order to add a new row you need to use the Add row button. Then you will see the empty field with Add column(s) and Remove row buttons.
Remove row one removes the row (field).
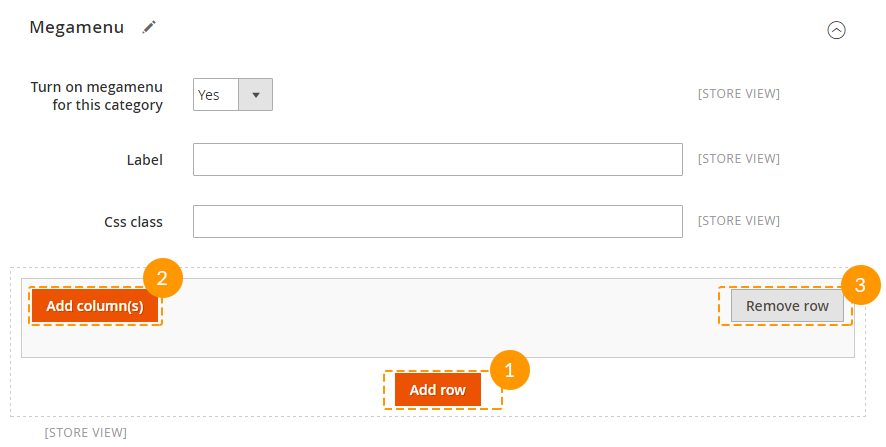
After pressing the Add column(s) button you’ll see a pop-up window to select the width of the column you’re going to add. The maximum width of the column is col-12, it stretches menu block to the full width of the container. So, if you need to display 4 columns in a row, you have to add 4 columns with the width parameter set to col-3.
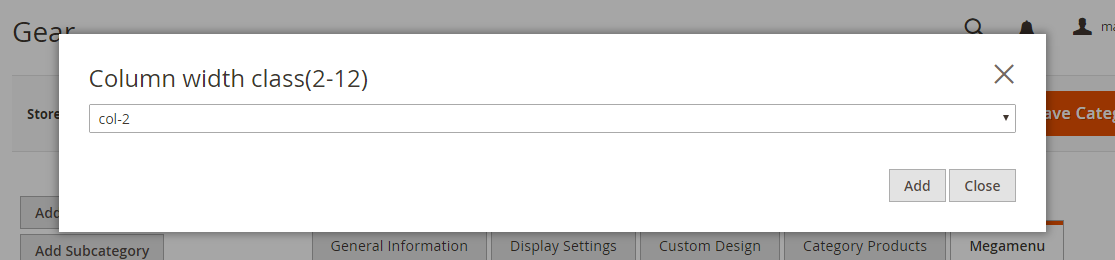
Let’s take a closer look on the columns’ settings:
- Set column width – column width. It can take values from col-1 to col-12.
- Enter specific class – custom css class of the column, so that you can further create styles for this column using css rules.

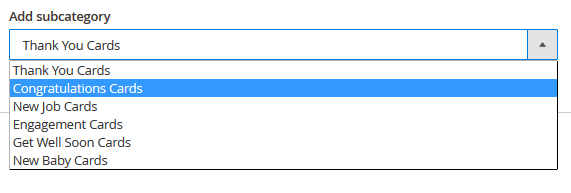
- Add subcategory – subcategories dropdown for the parent category. This option allows you to select and display the subcategories you need. In order to do this, choose the subcategory among the list and press the Add button. On the next step you will see this category listed at the Selected items field.
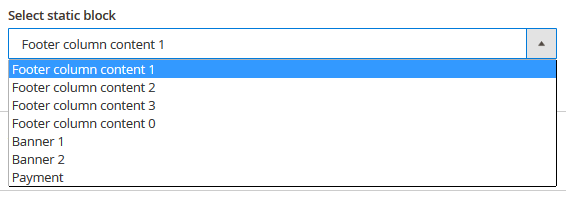
- Select static block – static blocks dropdown list. You can show any of site static blocks in the dropdown menu same as the list of subcategories if it was previously added to the shop admin panel. In order to add a static block, choose it among the list and press the Add button. Static block title will be listed in the Selected items field.
- Add products – adds product to the menu. This option allows you to add any of site products to the menu. Product image, title and a price will be displayed in this case. After clicking on this button you’ll see the pop-up with the list of products, available for adding. After adding the product to the menu its title will be listed in the Selected items field.

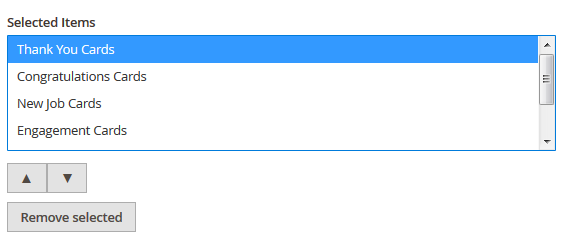
- Selected items – the field for sorting the items. It allows you to change the display order (sorting) of your column content. Drag&Drop interface allows to reorder items by dragging them. If you do not want the product or static block to be displayed below, just drag it to the top to reach the required appearance. You can also remove certain items here. Select the ones you need to remove and press the Remove selected button to do that.
As well as parent categories, the subcategories can be configured in a most convenient way for website’s customers.
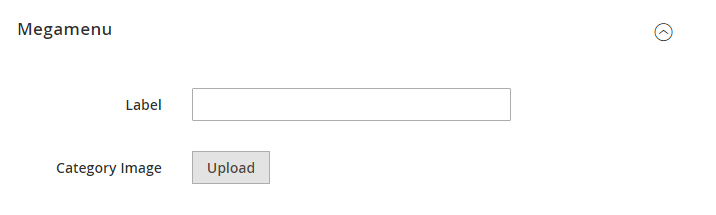
In order to configure the subcategory, open its page and navigate to the Megamenu tab. You’ll see two options there: Category image and Label. To add the subcategory image click on browse and choose an image from the clipart. As to the label adding, fill in the Label field.
Styles Configuration
You can edit scss style files to configure custom megamenu appearance. These files are located at the app\design\frontend\TemplateMonster\themeXXX\TemplateMonster_Megamenu\web\css\source\_module.scss folder. Do not forget to clear the cache after changing the styles and compiling.
