


From this tutorial you’ll learn how to change Booked Appointments plugin settings.

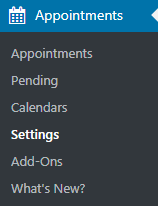
Settings Location
To access Booked Appointments plugin settings, navigate to Appointments tab on the left of the Dashboard. Here click on Settings sub menu. The settings page will open instantly.
General Settings

- Booking Type — here you can select if you want only registered visitors to be able to book appointments, or you allow all the visitors including guests to do it.
- Booking Options — here you can set if you want the visitors to enter their name only to book an appointment, or you need them to enter the full name.
- Appointment Booking Redirect — in this block, you can configure redirect options for the calendar page.
- Login Redirect — here you can enable redirecting visitors when login to your custom page instead of the one they were before.
- Custom Login Tab Content — you can enter the custom message to display it in the login form. Type in the text in the content field to use this option.
- Time Slot Intervals — here you need to select the time intervals for the appointment time slots. Just select the preferable interval from the dropdown list to select it.
- Appointment Buffer — here you can set the interval buffer between appointments not to let several appointments be too close in the schedule.
- Prevent Appointments Before Date — you can enter the date in this field to prevent getting appointments before the certain settled date.
- Prevent Appointments After Date — the option works similar to Prevent Appointments Before Date. Just enter the date after which you don’t want to have appointments.
- Cancellation Buffer — here you can define if you want to prevent the appointments from being canceled too close to the date.
- Appointment Limit — in this block you can set how many appointments the visitor can book at one time.
- New Appointment Default — select, if you want the appointments to be approved automatically, or you need to approve them yourself.
- Display Options — in this block, you can manage such display options, as hiding time slots, Add to Calendar button or the number of already booked time slots.
- Other Options — here you can select if you want to restrict the visitors to cancel their appointments, redirect users or hide appointments.
- Front End Color Settings — in this block you can manage the colors to use them for the Booked Appointments calendar appearance.
Emails Settings
In this block, you can change different settings for the emails. There are three different email settings tabs containing different settings options.
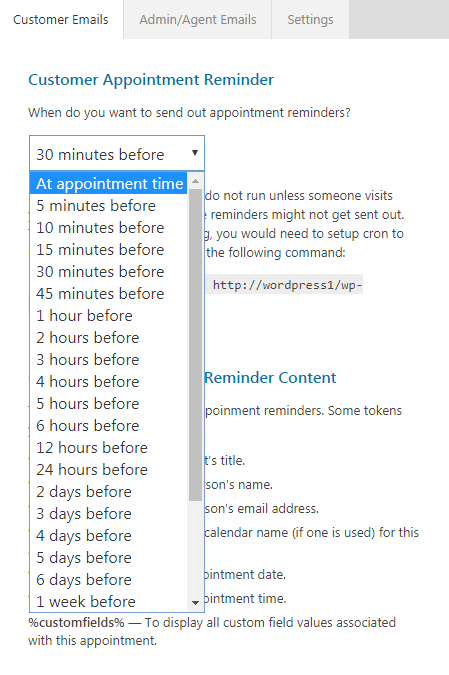
- Customer Emails — using this tab you can define when you want to send the reminders of appointments to the customers. There are also different content fields where you can enter your custom text for the reminder email, user registration email, appointment confirmation, appointment approval and appointment cancellation emails.
- Admin/Agent Emails — here you can set the time when you want to send out appointment reminders, and add your custom text for appointment reminder, request and cancellation messages.
- Settings — here you can upload a logo to use in the emails and select the administrator or agent email to send the reminders to.
Time Slots Settings
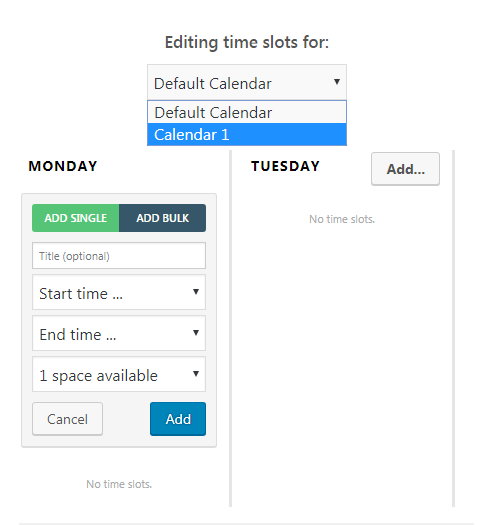
- In the Editing Time Slots for select the calendar that you want to edit. To do it open the dropdown menu and click on the calendar title you want to choose.
- After that, you can add time slots for each day of the week. To add a new time slot click on Add button. You can add single or bulk time slot.
- Next, you’ll need to fill in the details for the time slot: the title, the start time, the end time and the spaces available.
Notice, that all the fields are required. Don’t leave them empty.
Custom Time Slots
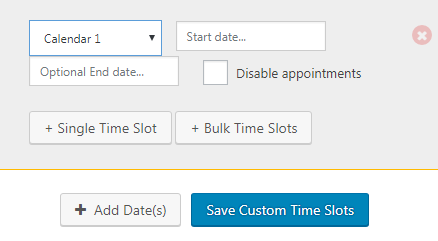
- To create a custom time slot click on Add Dates button. As a result, the block required for adding a custom time slot will open.
- Select the calendar to which you want to add a custom time slot. Add a start and end date. You can also check Disable appointments if you don’t want to have appointments for this time slot.
- Click on Save Custom Time Slots to save the changes. As a result, a new time slot will appear.
Custom Fields
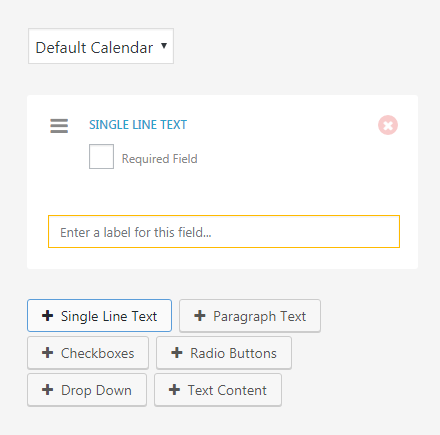
- Here you can add the custom fields to one of the appointment calendars. Choose the calendar to which you want to add new fields from the dropdown menu and click on it in order to add the fields to its structure.
- Then click on the corresponding button to add one of these custom fields: a single text field, a paragraph text or a checkbox. You can also add radio buttons, a dropdown menu or a text content.
- Each field has its own settings. Fill in all the necessary fields in order to add content to your appointment calendar. As a result, you’ll have additional text fields and checkboxes.
Export
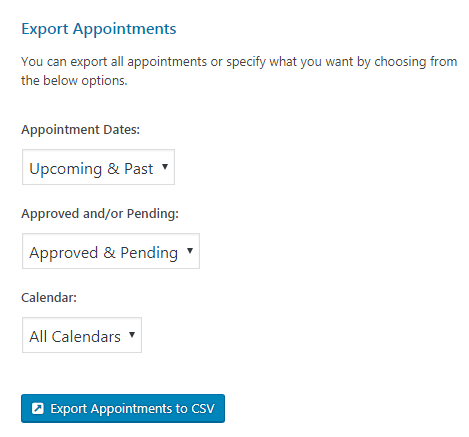
In this block, you can export the set appointments to CSV (the table) and select what appointments are to be exported. As a rule, the option is helpful when you need to get the selection of the appointments in the form of tables.
Shortcodes
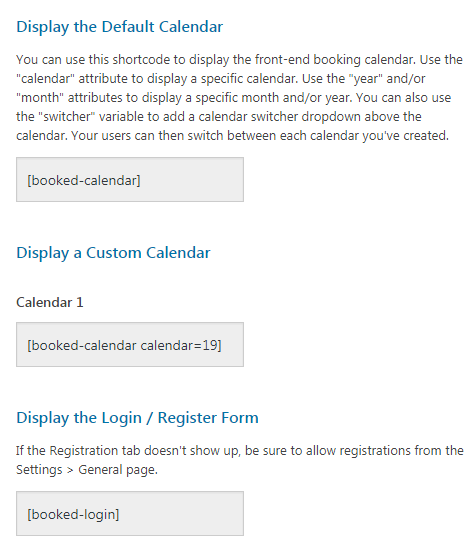
This block provides you with an opportunity to display a calendar, a login form, a user profile and user’s appointments on the pages using special shortcodes. Just copy the shortcode corresponding to the content you want to display and paste it into the page’s content area. As a result, you’ll introduce the calendar to your website’s page.

