


Today we are going to learn how to manage TM Instagram module in your Joomla template.
Nowadays most of the people can not imagine a day without checking their Instagram feed. Since it gained so much popularity, it is a must that you have your own Instagram feed integrated into your website.
Luckily, we have a great module that allows doing so: it is easy to use and should be everything you need when it comes to displaying photos from your Instagram feed on the website. So, let’s learn how to manage it.
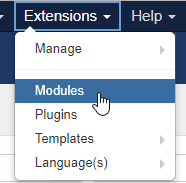
- Navigate to Extensions ->Modules tab in your Joomla administration area.
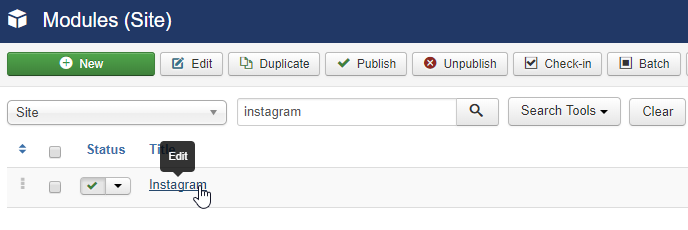
- Use “Search” field to look for the Instagram module. Once the results are filtered and the module appears on the screen, click its title to open module settings interface.
 The first tab called “Module” is the most important – here you should set several options to make the feed from your specific Instagram account actually displayed on the website. Here they are:
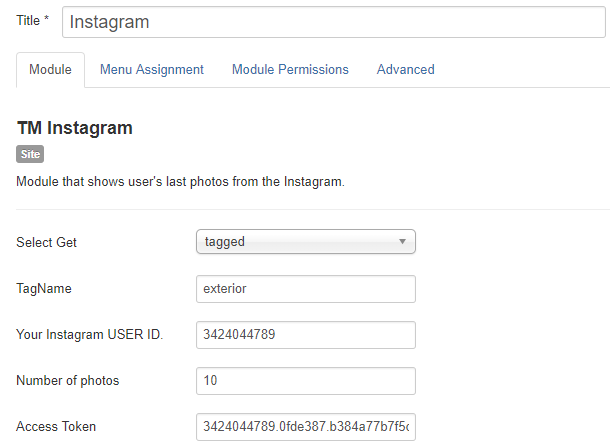
- – Select Get – choose whether you would like to have tagged photos displayed or just all the photos of specific user;
- – TagName – input the tag name/username you want photos to be loaded from;
- – Your Instagram USER ID – make sure to navigate to Instagram developer register page and log in to your Instagram account there in order to get your User ID. Alternatively, you can use the following resource to find out your user ID.
- – Number of photos – set the number of photos to be displayed in the module.
Do not forget to assign the module to the desired position of your website by setting the Position option on the right-hand side of the “Module” tab screen.
Usually, it is somewhere in the footer where the Instagram feed is added to, however, it is still up to you where to have your photos displayed to attract even more visitors to your website.
- Now, switch to the second tab called “Menu Assignment” – choose pages where you want the module to appear.
- You may also set specific options under “Advanced” tab, like the Bootstrap Size of the module and module Header Tag (h1, h2 etc.)
- Once all the options are set, make sure to click “Save” or “Save & Close” button at the upper left of the screen to apply changes.
- Open your website frontend and refresh the page to see changes. Congratulations! Now you have shared your nice Instagram photos with all the site visitors.
That’s it! You are now fully aware of how to manage TM Instagram module in your Joomla template.

