


From this tutorial you’ll learn how to create login form using Cherry PopUps plugin. To learn more how to use it please, feel free to read How to Use Cherry PopUps Plugin and Add PopUp Windows tutorial.

Creating Login Form
Mind, that you’ll need to install and activate WordPress Social Login plugin in order to create login form using Cherry PopUps.
- First, log in to WordPress Dashboard and navigate to PopUps > Add PopUp tab on the left.
- Fill in the login form title in the Title field and add content to the content block.
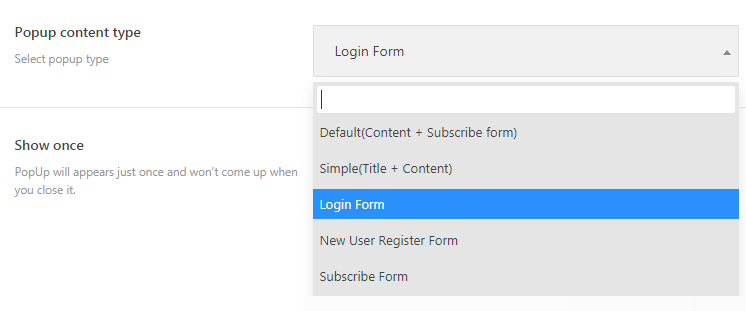
- Scroll the page down to see the PopUp settings. In the General tab locate PopUp content type. Here select Login Form from the dropdown menu.
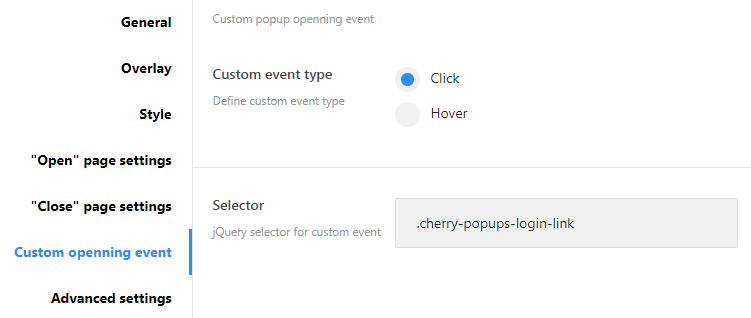
- Now select the custom event type (Click, Hover) on which the popup window shows up.
- Set the selector in the Selector field in the Custom Opening Event block. The popup with the login form will open on the chosen event. E.g., we defined .cherry-popups-login-link selector.
- Let’s create a login link. To add it you need to add the following action code into header.php file. Navigate to Appearance > Editor tab on the left of the Dashboard and paste this code to the header part where you need the login to appear.
do_action('cherry_popups_login_logout_link'); - You can view the example of the log in form on the image below.

All in all, what is the most convenient method of the login? Naturally, nobody loves the long and difficult way of doing anything on the page. For this reason, the popup login is a genius idea to make the users feel free while using the website. At your service, there are several steps to obtain the popup login form. It will look modern and manageable to use even if the client isn’t a pro in website scrolling.

