
From this tutorial, you will find everything you need about creating a blog page with the Gutenberg editor and GutenBerry theme.
Creating a blog page with Gutenberg
A Blog page is a page where your visitors see all the publications existing on your website. It is a dynamic page, which means, it displays the publications added on your site from most recent to the first ones, ordering them by date.
It’s important to know, that at the moment you can design the way the publications are displayed, however, the post excerpt, featured image, the post meta and title will be pulled from the publication.
You need to make sure that there are publications on your site, and you have set the featured image and all the information you want to showcase on the Blog page in Posts listing beforehand.
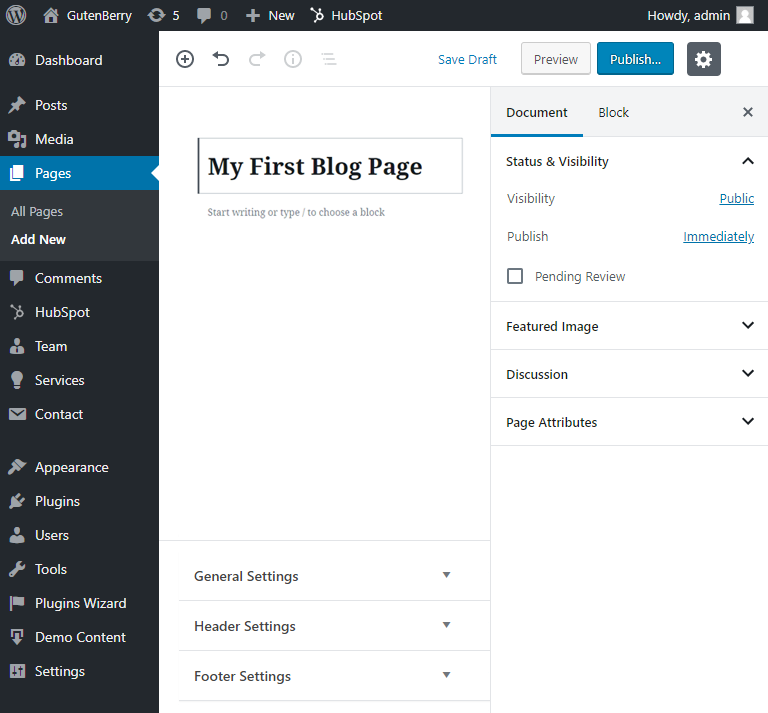
To create a Blog page on your website, you need to go to Pages > Add new, and here we go!
First and foremost, you have to choose the name of your page. We will name it “My First Blog Page”, but your page name has to be a small piece of introduction.
You may fill the page with classic Gutenberg Posts block. However, if you want to save your time and get more additional settings to customize your Blog page, you may use ZeGuten plugin. It has 5 responsive posts layouts to make your page more attractive and engaging.

Creating a blog page based on Gutenberry
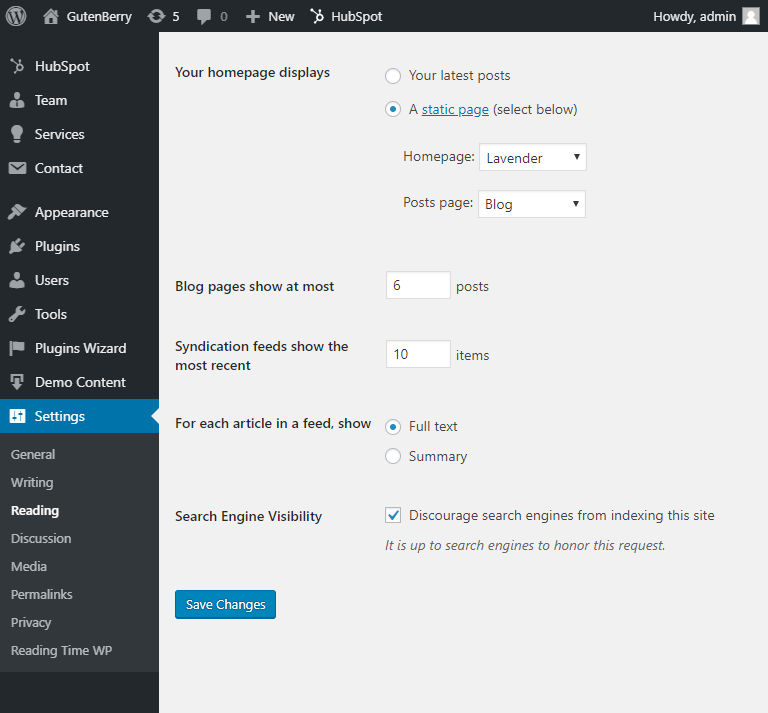
Once you’ve created a Blog page, you can navigate to Dashboard > Settings > Reading and here locate Posts page dropdown. Specify the page you’ve just created and hit Save Changes button.

Congrats! Now you’ve assigned the newly created page as your Blog page. However, there are still so many ways you can do to customize it and make it unique.
Open the newly created Blog page in Customizer and access Blog Settings tab, then go to Blog tab to see what you can do.

By default, most likely, you’ll see all the publications on your site shown as a listing. To change the way the publications are displayed use:
Layout Blog Type – here you can choose a layout from the dropdown to make your publications be displayed as a Grid.
Columns – when you’ve set a Grid layout for your blog, you’ll see the dropdown to choose the number of columns into which the posts will be displayed.
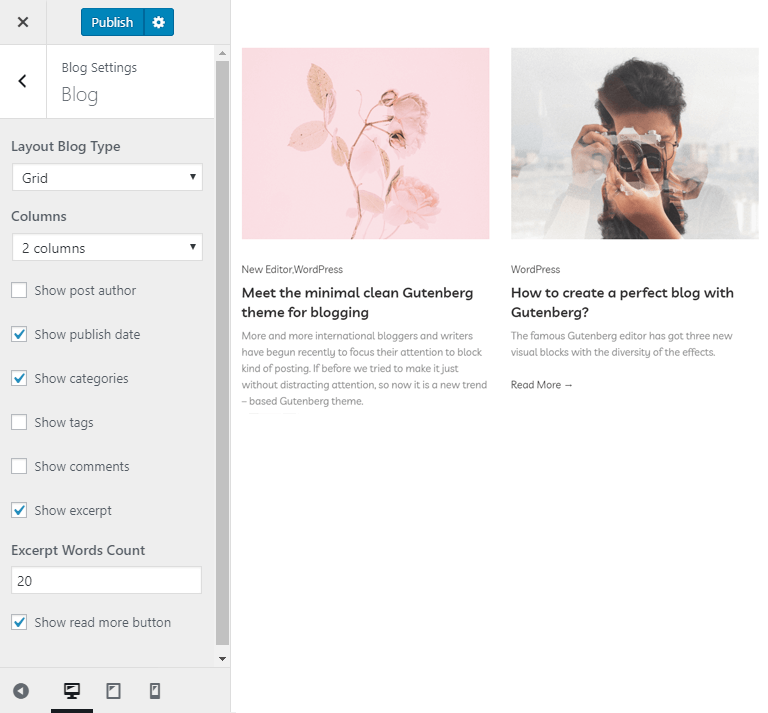
There are also the settings that will help you decide which meta data for the posts you want to showcase: post author, publishing date, categories, tags, comments count, etc.
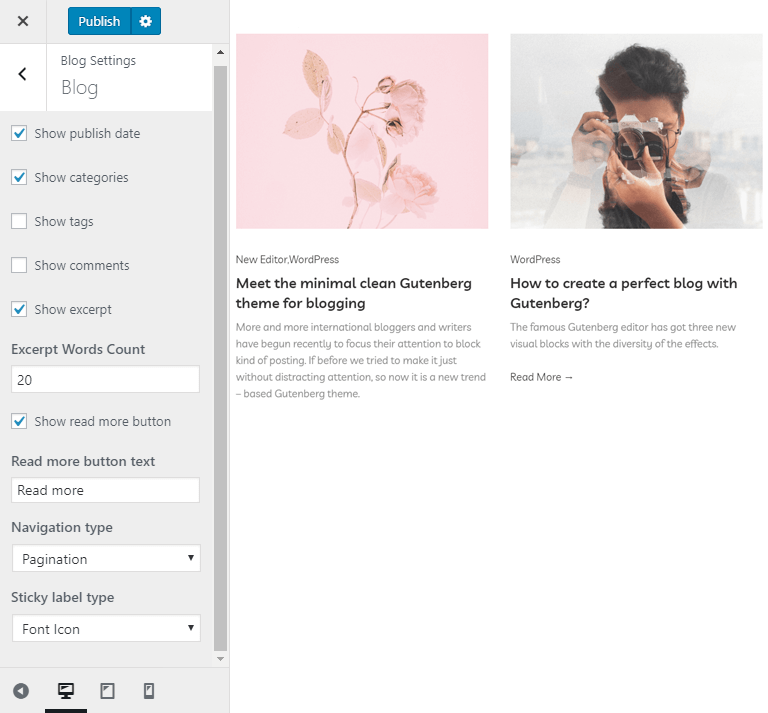
The last checkbox allows you to enable the posts excerpt to be shown.
Enable Show Read More button to let the visitors click it and navigate to the single post page.
Also you’d have to set the Sticky label type to mark your posts as sticky if there are any.
Enabling navigation for the blog page
When you have lots of posts on your site (yeah, you’re a blogger, sure you’ve got them) you know how uneasy the visitor might feel when he needs to scroll the page down while looking for a particular post you’ve published some time ago.
To make the process way easier you can add a navigation type to the Blog page. It can be an option that allows going from page to page, or navigational arrows.
While you’re in Customizer, you can change the type of navigation to use for the Blog page in Navigation Type dropdown.
Here you can choose either Pagination or Navigation.
If you don’t see any pagination elements, this means, you still have to set the number of posts to show per page.
Go to Dashboard > Settings > Reading and define the Blog pages show at most value (it should be less than the number of posts you’ve got in order for you to see the pagination option).
In most cases this will be enough to create a blog page. However, if you want to create a static page with dynamic publications listing, you can do it in Gutenberg. Keep reading to learn how.
Creating a static blog page with dynamic content using Gutenberg
Once again you should create a new page. And now we’re getting started.
Let’s add the Posts block to the page’s canvas! Simply click on the “+” icon seen on the left from the “Start writing or type / to choose a block” text. Pick the block called “Posts” – you can locate it in ZeGuten blocks category.
Now you can see that the Posts block displays the publications you have on your site using the default settings. Let’s tweak them up a bit for better results.
By the way, you can easily use the shortcusts for Gutenberg to speed up your work. If you don’t know how to use the keyboard shortcuts, feel free to read this guide.
Posts block settings. Setting the posts layout in Gutenberg
Let’s establish all the necessary settings to work with the design of the posts layout and the content you want to pull from your posts to show it in the blog. Luckily, in the Gutenberg editor, you can do everything you need while using Posts block. It will take no more than several minutes.
Posts block: layout options
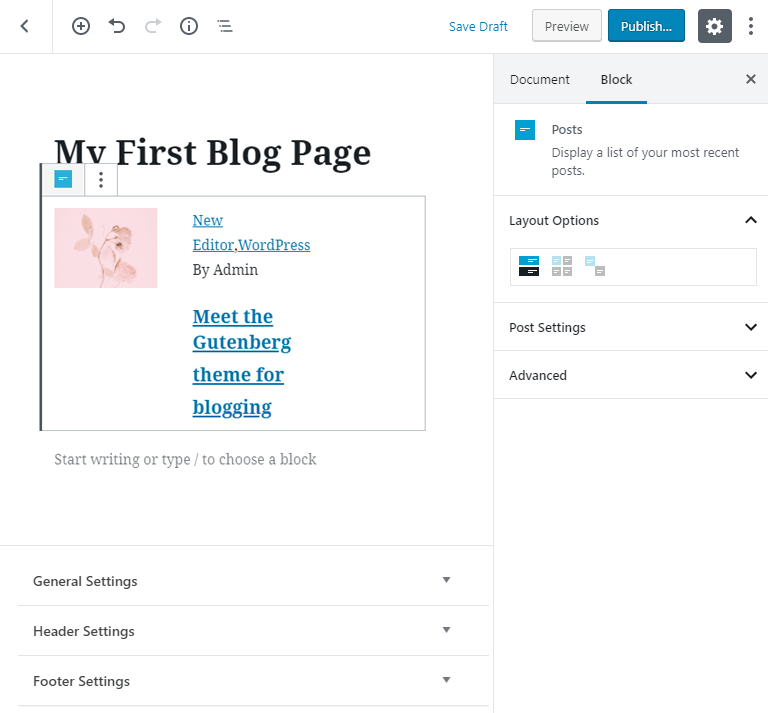
Locate the Block settings bar on the right of the page’s canvas. If you don’t see it, this means, you have previously closed it. To get it back, click the cogwheel icon in the top right corner. Then click the Posts block on the canvas to make it active and access its settings.
The Posts block allows to choose from 3 different layout options:
- Posts List – it’s a clean layout where posts are arranged one by one in one column;
- Posts Grid – a layout where you can display posts in several columns and rows, setting the grid to showcase publications;
- Uneven Posts List – use this layout to arrange the posts in the chess order. Here you’ll have one column, and the posts are displayed one by one in a form of listing with the even rows showing the featured image on the left, and uneven displaying it on the right.
Open the Post Settings below to choose the publications you’d like to pull using this block.
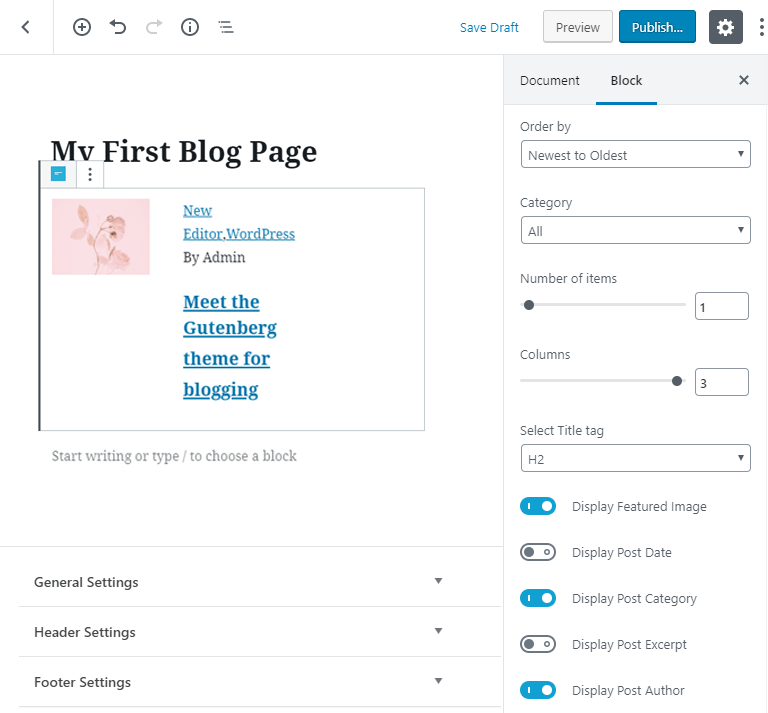
Here you can set:
- Category – the category from which you want to display the publications.
- Number of items – limit the publications to a certain number, and not display more than a certain number. The maximum is 100 publications, but you certainly can use Read More settings to get the block look shorter.
- Columns – use this toggle to set the number of the columns for your grid layout. The maximum number of columns is 6.
- Select title tag – here you can set the html tag to use for the title (H1 – H6). Make sure your title is set properly in order to range higher in search results.
- Order by – this option allows ordering the publications from oldest to newest, from newest to oldest, and use alphabetical order to set an order.
There are also options for:
- displaying featured image – you must make sure you’ve set featured images to your publications in order to see them;
- displaying post date – an option to showcase the date on which the post was published;
- displaying post category – this will allow the visitor to see to which category the post’s related;
- display post excerpt – enable this option to showcase an excerpt from your post (it can be a custom one or an excerpt generated from your content), you’ll be also able to set the excerpt content length by trimming the number of words;
- display post author – enable this toggle to show who has written this publication.
Read more settings
As long as you want the visitors to open your posts and proceed to reading, you’ll be able to display a Read More link and customize how it’s displayed, replace the default text with your own one, etc.

You’ll also be able to decide if you want to display the Read More option for each post as a text or as a button.
The posts block is good for working with dynamic publications, yet it doesn’t allow to enjoy the full power of custom query yet. Yet it will be an unmatched asset when working with the static pages of your blogging website.
Please note that there are no pagination options yet, so if you want to show off all of your posts, you’d need to set the number of posts to maximum. You can as well assign the newly created page as your main blog page in the Settings, or you might keep the things as they are, and make it show as your blog only in menu (where you should link it), while keeping the Blog page as your posts archive.
The other way to approach this task is to add a link to the posts archive page (a real Blog you’ve created in the first part of this tutorial) to the bottom of the posts list to let the visitors access all the publications.
Congrats! You’ve created and designed your first own blog page! Please subscribe to our newsletter to get even more tips on how to work with Gutenberg and Gutenberry!

